Pond build and pond liner installation should be a straightforward procedure provided these simple rules are followed:
Pond Planning
 Decide where your pond is to be sited, ideally a level site that receives at least half a day’s sunlight and is not crossed by buried pipes or cables. Also check the availability of electricity and the cost of running pond pumps, lights etc. The use of a length of rope or garden hose laid out in the proposed shape of your pond should help you decide what is right for your site. The depth of the pond should be a minimum of 18’’(0.46m) and generally the deeper the better as this helps maintain a more stable temperature and avoids complete freezing in winter.
Excavation
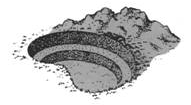
 When digging your pond try to ensure a slope of 15º on all sides and incorporate shelves at different depths to accommodate the needs of various aquatic plants. Make sure the top of your pond is level, that all sharp objects are removed and that there are no roots that may grow and penetrate the pond liner. It is a good idea to line your pond with a protective underlay as an added precaution against damage to the liner.
Pond Liner Installation
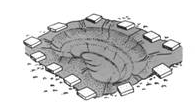
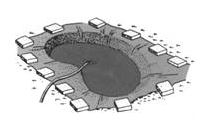
 Once the excavation is finished the liner can be draped evenly over the hole and allowed to settle into the contours of the pond, keeping an even overlap on all sides. The next step is to push the liner into place and ease out any small wrinkles and neatly pleat any larger folds. Now begin to fill the pond. When the pond is full leave for at least 48 hours before finishing around the top edges (this is to make sure that the liner has not been damaged during installation). The pond may now be finished in the manner chosen. Ensure that paving slabs overlay the pond by at least 2” (51mm) to hide and protect the edge of the pond liner.
Pond Maintenance
Always keep the water level right to the top. This will require regular topping up in summer as evaporation can reduce the levels. A pond liner that is exposed to the elements will have a shorter life and be more prone to mechanical damage. Avoid the use of sharp implements (garden fork, rakes, sticks etc) when cleaning the pond.
Finishing
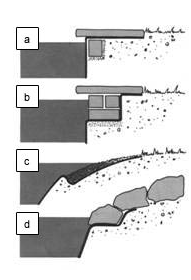
 a. Here a firm edge has been made behind the liner at the top to give a firm level edge for the paving slab. Make sure any gaps between the bricks are packed with sand.
b. This method will hide the top of the liner but make sure that the bricks used are suitable for the purpose. All cement must be sealed.
c. To achieve gravel ‘beach’ type area a small ridge should be made below water level to stop the gravel rolling to the bottom of the pond. This system is ideal for wildlife ponds giving easy entry and exit to the water while protecting the liner from damage. A layer of protective underlay between the gravel and the liner is recommended to protect the liner from puncturing.
d. A rockery that goes right into the water can be achieved by the method shown in the diagram. There must be adequate protection using a protective underlay under the rocks to avoid damage to the liner.
Visit Liners Online range of pond liners >> PVC, Butyl and Epalyn pond liners


